So this is the girl I get to point my camera at every day. And of course, even when I’m not on a shoot.


So this is the girl I get to point my camera at every day. And of course, even when I’m not on a shoot.

It’s always a funny feeling walking into a concert hall foyer that is familiar to you from years of concert-going (in this case, Wigmore Hall), and unexpectedly spotting one of your own photos.
A funny feeling, but a good one. (That is, if the photo was from a commission. I dread doing this one day to find a pilfered image on display; I guess this is quite uncommon given the nature of this kind of photo. It happens all the time online, but – one hopes – less in the world of print.)
I worked with the Lawson Trio last year, before Clara joined the ensemble. It’s always that photo right at the end of the session, when everyone is freezing, windswept, and tired of lugging bags around, and you probably went on for two hours longer than you planned to – it’s then you finally get the shot:

Anyway not so this year. Like gold-dust, we found a lovely secluded little space outside a property management company right next to Tate Modern that gave us impromptu permission to shoot on their land. So lovely finding “Real Human Beings” from time to time, when London seems so full of officious security guards and companies who are so obsessed with faux health and safety, insurance, PR, and frankly any other reason to not let you shoot anywhere near them.
(Thanks, Neo Bankside – nice people.)
It wasn’t quite without interruption, but mercifully we were left alone after name-dropping the “real human being” who said we could shoot there. Anyway, the result of a little bit of planning, a lot of improvisation, and 2 hours of shooting:

Next up, we made use of the fact that photography inside the Tate corridors is permitted, with this great little scene shot across the escalator:

Finally, onto a favourite location of mine. Millennium Bridge is a footway across the Thames which connects the Tate Modern to St Paul’s Cathedral. Actually many photographers love shooting here, and you often have to fight for the specific spot as we did! This is because it’s such a great place to capture people, movement, old architecture and new.
The really exciting thing for me is that I managed to get my hands on a Microsoft Surface Pro for the best part of a day (colleague of a colleague), so naturally the first thing I did was to install my copy of Lightroom 5 on it, and give it a spin.
It’s very exciting indeed to edit photos directly on a tablet, without the usual restrictions you expect from an iPad. The Microsoft Surface Pro is absolutely superb for Lightroom because it uses a 128GB SSD which makes the process really snappy. Sure, it’s not quite capacious enough for your average working catalog size, but it’s wonderful for throwing into your bag and carrying out some edits over a coffee.

The Microsoft Surface Pro comes with a Wacom digitizer which I didn’t have time to test out fully, but there’s something a little unreal and wonderful about using a pen directly on your photographs in Lightroom without being tethered to a desk and a Wacom off to the side.
Actually I fell head-over-heels with this little computing device, and was surprised that it was even possible to use for serious editing work.
Perhaps I will get my hands on a Surface Pro again to give it a full review here on the blog, but I’ll leave you for now with that edited shot. I brought it back onto my primary editing setup to check contrast and colour, which were both good. I may have gone a little overboard with the blue backdrop masking but it’s quite a fun effect.
So here’s the finished product, an hour of backdrop masking in Lightroom on the Surface Pro!


As I tweeted the other day,
Overheard myself at dinner at Italian resto: “if I wanted a bloody PINOT GRIGIO I would get myself a fake tan and head to Carluccio’s”
— matsmithphotog (@matsmithphotog) July 30, 2013
Anyway wine prejudices aside, I am a huge fan of this man. The first time I tasted his amazing Penne Giardiniera in Ealing I was bowled over, then so glad many years later when the recipe was published and I could make it in my own home. What a recipe.
Anyway, I took a portrait of the great chef in his deli restaurant in Chiswick last year, and realised I never blogged the photo.
I rarely shoot just with natural light, so this was a bit of a stylistic departure for me, but I hope you like it. The shot is lit from the front of the shop, hence the striking (unbalanced?) white balance of the subject vs. the backdrop.


In this article, I’m going to tell you how to get the best possible portrait shots from your iPhone. I’ll also share with you some software I use; these apps are very well-loved by amateur and professional photographers alike.
There was a time I lugged my primary DSLR around with me everywhere I went. Out for dinner with friends, out and about in town, everywhere. The camera lived on my shoulder constantly but, the more time I spent shooting professionally, the less I was inclined to take my DSLR, opting instead to take various other smaller cameras for everyday photography; Canon G6, my beautiful old Nikkormat with 50mm 1.4 lens and a roll of Fuji BW film, even a twin lens reflex was smaller and easier to carry around!
Now I’ve been a professional photographer full-time for 4 years, and the only camera I ever take out with me when I’m not shooting for a client is my iPhone 4S.
The iPhone 4S camera is nothing to write home about, photographically speaking – of course. Without a large piece of glass in front of that sensor, it never will be.
But the point is: it’s good enough. Good enough that shooting portraits can be an enjoyable affair – quick, instant, and good results. The lens and the quality of the sensor are no more than adequate, which is precisely what you need from a tiny take-everywhere camera. The barriers to taking good portraits have mostly been removed; the process of shooting is no longer cumbersome as it was in previous generations of the phone, and I’m always able to predict the optical and digital quality of the images will be good, unlike many other camera phones I’ve used.
Here’s a shot I made yesterday on an unexpected visit to a coffee house in Amersham, where I unexpectedly met Claire and friends:

A portrait shot with the iPhone
iPhonography is a fast-moving thing, so make sure to keep-up with the latest apps. I’m an incessant reader of reviews in the app store, and I research apps online a lot. Over the years I’ve purchased, downloaded, and tested tens of photo editing apps, but here’s a quick summary of the ones I always come back to.
![]() I’ve used this app every day over the last year.
I’ve used this app every day over the last year.
This has been my favoured go-to app for almost every photo I’ve shot on the iPhone. Made by Nik Software, who have a good pedigree in professional photo editing software, the app combines some of the toy-like features of Instagram with some really decent manual editing functions. The Instagram-like photo filters are actually fully manual functions with presets and a randomize feature, which does provide some ‘playability’ if you aren’t sure what look and feel you are going for.
On the whole I avoid using Snapseed’s “vintage” or “grunge” filters as they are way too ‘Instagrammy’ – they detract from the purity of the image. My style is to accentuate and to make the image pop. I use “drama”, “crop”, “selective adjust”, and “tilt shift” a lot, though. I also use the “straighten” function to rotate images although I do find that a bit fiddly. More on how I use this app later.
![]() Whereas Snapseed is about bringing out the best qualities of your photos, Big Lens is basically a naughty app for cheats. Don’t get me wrong – you have to put a lot of work in, and the results are very good, but it essentially emulates the look and feel of a big lens where you might stop-down the shot to reduce depth-of-field. Put simply it blurs out the background of your image. (Plus it does a whole load of other things.)
Whereas Snapseed is about bringing out the best qualities of your photos, Big Lens is basically a naughty app for cheats. Don’t get me wrong – you have to put a lot of work in, and the results are very good, but it essentially emulates the look and feel of a big lens where you might stop-down the shot to reduce depth-of-field. Put simply it blurs out the background of your image. (Plus it does a whole load of other things.)
Every great portrait has a good separation of subject and surrounding.
By blurring out the background of your image, you are accentuating the subject and drawing the eye in to the photo. You are removing distractions from behind the subject which is something you can only usually do with a big piece of glass on the front of your camera. The app actually has “aperture” settings to emulate f stops (f3.5, f3.2, f2.8 etc.) although clearly these are to be ignored as, technically speaking, they are nonsense. Add to this the fact that it’s technically not a great idea to mask out a subject using a pen tool, and you’ll see why this app isn’t for photography purists – but I like it because it does give 95% great results a lot of the time, at least for portraiture.
The above are great for post-processing, but what about replacement apps for the iPhone’s camera?
Personally I don’t use one. I have a number of theories on this one, not least the fact that there’s a good chance you will inadvertently begin using an app that doesn’t support the resolution of the latest iPhone. It’s a huge flaw, but I’ve seen it before. App developers tend not to make a big thing of such flaws.
If you do prefer to use a special app for taking photos, instead of iPhone’s built-in app, then make sure you do your research. Find an app that definitely supports your iPhone camera’s resolution, and one that doesn’t attempt to make your images brighter. Apps that claim to make the image brighter are actually pre-processing apps; all they do is remove the options to fine-tune your photographs in post-processing afterwards.
The greatest thing about instant mobile photography is taking your image from start to finish without getting your desktop editing software out! You can do it all on the bus.
I’ve settled on a process I like, which gives my images a certain look and feel. I’d encourage you to find your own process to make images that suit your own eye – this is the key to becoming a great photographer.
That aside, here’s my process:
I settle on my favourite image version by doing quick mock-up edits of a few different versions, cropping accordingly. I delete extra versions of the same shot and set about editing the chosen image.
I load the image up in Snapseed and straight away use the “drama” filter:


Use Drama filter
I’ll get the filter strength as high as possible without it looking to hyper-real (it gives a surreal bad-HDR effect if over-used).
I bring the saturation UP as it’s usually too low by default. Here I’ve used +54.

Set the saturation and strength of filter. Experiment with options.,
I make a note of the numbers and then try out different combinations of the two settings for this filter. I press-and-hold the top compare button a few times to decide whether I went over-the-top:

Always keep stopping to compare as you go
Then I apply the filter:

Click to apply the filter, before moving on to the next filter
Sometimes the image isn’t nearly bright enough. To fix this I tend to prefer using the “Tilt Shift” filter (instead of the “tune image” filter), as this has a really nice brightness algorithm. Although the image is exposed nicely here, I still use it to slightly push-up the brightness:

Use Tilt Shift instead of "Tune Image" - nicer algorithm for brightness
I use two fingers to pull-apart the Tilt Shift area, so that the diagonally opposite corners get a tiny amount of blur, and I tend to leave the other settings as they are. Perhaps I will tweak the saturation a little.
Next up, crop:

I prefer to crop and straighten as last step in Snapseed
I usually double-check my edits using the compare feature from the main screen (this time, press-and-hold the image. The compare button shown above is only when you are in one of the filter views).
All done! Now I save the image out to the camera roll.
Next I load the image into Big Lens. Always use “advanced” to mask the image:


Always use the manual / advanced mask technique
Now draw the brush around the subject. Then click Auto to tighten up the edges:

Make a rough drawing

Auto helps get your edges half good, but you need to edit them more
Zoom in to erase the mask where it shouldn’t be, and use the brush tool to re-apply if you removed too much:

Pinch to zoom, pan with two fingers, use brush and eraser
To pan around, use two fingers.
Be patient, this process takes a long time. If you mess up, it won’t look good. There’s an undo button you can use for brush strokes. You really need to be a little bit anal about this process. Don’t worry though, you can try it out and go back and edit the mask if you like.
Use the arrow top-right to move to the next stage. Now apply your aperture size.
You can see here, I’ve gone too far. This makes it look unnatural, and you can also see masking artefacts more, if you look around the edge of the subject:

Dodgy masking - either re-mask or lessen the blur effect
I went for f3.2 in the end. I also used the ‘pop cold’ filter, which only applies to the backdrop, to further draw the eye in. I turned the filter strength down to about half:

Add a filter if you like, but dial-down the settings
Again, use press and hold the compare function. Play around with the other options.
But there you have it: a great looking portrait from a tiny camera in your phone.
Here’s a quick before and after comparison:

Comparison of image before and after processing

A Cinegraph, or Cinemagraph, is a still image with some constituent parts that are moving.
Personally I think the concept is quite unique. It’s not the same as an animated GIF, the somewhat tacky pre-cursor of video on the web, where the whole image moves – usually as 3-5 second sequences in loops. Nor is it the same as video. It is a kind of moving still, where the photographer / artist (we can’t call him the film-maker) decides which parts of the image will move and which parts will be static.
This creates an interesting tension between objects whose movements are shown, and objects which were clearly moving but whose movement is frozen in time.
Testing Image #1: The Tiniest Movement Throws It Off

You can find some great examples of the power of Cinegraphs if you look anywhere online, but for now here is my first evening of work on the concept.
It’s a steep learning curve that combines frame-based image masking and editing, stills extraction, and a good degree of artistic direction when done well.
Don’t believe the multitude of tutorials online that tell you it’s really easy and super quick to do. Well it may be – but not to do one well! Try it yourself…
The artistic direction of the two photos below is next to none, but these were just testing images.
Have you seen Cinegraphs on the web? What do you think? Powerful, quirky, or gimmicky?
Testing Image #2

Whilst the iPad 2 is probably one of the bluntest photographic tools imaginable (even my out-of-date iPhone fares better in terms of image quality), I have always believed the quality of a photograph depends not on the lens itself, but what happens in front of it. And of course the light.
One of the joys of the sorely-missed Polaroid era was its instant gratification appeal; where friends could see the image straight away, burst out laughing, and take another. As a photographer who adored working with Polaroid SLR, it makes my heart flutter just thinking about it.
Even just working with a single model, Polaroid SLR created this incredible synthesis between photographer and subject that has so far not been recreated even in the digital age we now live in. Just take a look at the excellent work of Lou O’ Bedlam, one of the superstars of Polaroid for example. Or take a look through my own little love affair with Polaroid.
This week I’m photographing for Topshop in Dublin, and next week the same in the Broadway store in New York. It’s for Topshop’s “Wish You Were Here” promotion. This is one of those inspired ideas of the digital age which you only really ‘get’ once you see it in action. But within a matter of minutes of greeting shoppers who agree to step-in to the studio, they are induced into fits of giggles and delight – and handed a gorgeous postcard print-out of their shot. With their permission, the photo may optionally be uploaded to their Facebook profile as well.
The concept features an interactive style of photography using an iPad 2 connected wirelessly to a nearby table of iMacs.

Topshop Dublin Floor Setup
Shoppers are invited into the mini-studio which has been set up on the shop floor, and they are allowed to dress up using a rail of clothing and accessories. Promotional staff, personal shoppers, and stylists are on-hand to help out. Mirrors and a makeup station are provided. In special cases where shoppers have their eye on a particular outfit they have seen in the store, they can change into it and come for the shoot.
We then work with the models to get the very best out of them for the few minutes they have in front of the lighting, suggesting poses and offering encouraging words. The studio lighting is adjusted for each model so as to get the best catchlight in the eyes and offer the best level of diffusion for the skin tones. This takes a matter of seconds during which time models can get themselves ready in front of the lights and prepare.
A couple of test shots are taken on the iPad which allow the models to check they are happy with their poses and expressions.
Then we hand over the iPad 2, and let models choose their preferred Instagram filter.

Dress-up

Taking the shot

Taking the shot

Previewing the shot

Choosing the Instagram Filter

Choosing the photo style
In many cases, we have a filter in mind when we take the shot. Sometimes you see a face and you just know what works…

The Instagram Result - Day 2 @ Topshop Dublin

The Instagram Result - Day 2 @ Dublin Topshop

The Instagram Result - Day 2 @ Dublin Topshop

The Instagram Result - Day 2 @ Dublin Topshop

The Instagram Result - Day 1 @ Dublin Topshop

The Instagram Result - Day 2 @ Dublin Topshop

The Instagram Result - Day 1 @ Dublin Topshop
Even after the first two days of shooting – as I write – the overall concept of the ‘Wish You Were At Topshop’ promotion has been a huge success. For me it somehow captures that same cult spirit of Polaroid.
It’s one of those projects where the technology becomes a little bit transparent, allowing the visual and kinesthetic pleasures of making photographs to take the stage again. This is mostly thanks to the great system design by FreshNetworks which automates the entire process and packages it beautifully.
And the concept itself? The combination of the grabbable iPad, the playable Instagram, the ubiquitous Facebook, the gleaming iMacs, and plain-old good quality 6×4 instant printing is clearly one that has already won a number of hearts.
I’d be surprised if the whole thing didn’t turn into a craze in itself.
In fact, at times, it makes you want to throw away your 5D and use an iPhone to take photos for the rest of your life.
Okay – maybe I’m not ready for that quite yet …
On Monday I met the three talented individuals who make up the Lawson Trio (http://www.lawsontrio.com) for a morning session of photography, starting outside Tate Modern then moving over the river to a variety of scenes around St Paul’s, Barbican, and Liverpool Street.
Annabelle Lawson: Piano
Fenella Humphreys: Violin
Rebecca Knight: Cello
Well – in the UK we are not used to such wonderful bright days at this time of the year (I recall last year at this time it was … snowing?) but it was the wind that was the real show-stopper.

Annabelle Lawson - Pianist for Lawson Trio - Mat Smith Photography
We had a lovely shot idea in mind but it was rendered impossible because of the direct sunlight (and the fact we didn’t have an entourage of 10 helpers to who can hold up flags / sun blockers / reflectors). Nevertheless, it’s always possible to run for shade, which is what we did for the first scene.
Oh and that brisk North Sea wind? Wind is never a major problem as long as it’s up and down. In fact I love the movement it creates, the expression on the face it causes, and the pressure it puts you under to click the shutter at the precise moment!

Rebecca Knight - Cellist for Lawson Trio - Mat Smith Photography
These photos were lit with a single umbrella in the shade, camera right. The first umbrella died a death in the strong gusts, luckily I had a standby brolly…

Fenella Humphreys - Violinist for Lawson Trio - Mat Smith Photography
Here are a few of my favourite shots from the two Polo Club Calendars photographed by Mat Smith Photography over the last year or so.
The unauthorised publishing, copying, or distributing of the below images is prohibited. Copyright Mat Smith Photography.

Hannah and Mini, Nottingham Polo Club Calendar 2010

Rosie and Horse, RVC Polo Club Calendar 2011

Five Bar Gate, RVC Polo Club Calendar 2011

Emily with Boots in Hay, Nottingham Polo Club Calendar 2010

Horse in River at Sunset, RVC Polo Club Calendar 2011

Horse Trailer, RVC Polo Club Calendar 2011

Champagne and Puppies, RVC Polo Club Calendar 2011

Eloise on Horse, Nottingham Polo Club Calendar 2010

Beth in Hay, Nottingham Polo Club Calendar 2010
When I asked Sarah Ellen Hughes, lead singer for Sector7 – a vocal quartet plus supporting piano trio – what style of music the quartet sang, the answer was a little vague.
“Kind of souly, funky, a mixture of our own stuff, with lots of different influences”.
“Well, okay. What kind of tunes will you be performing tonight?”
… “You’ll see”.

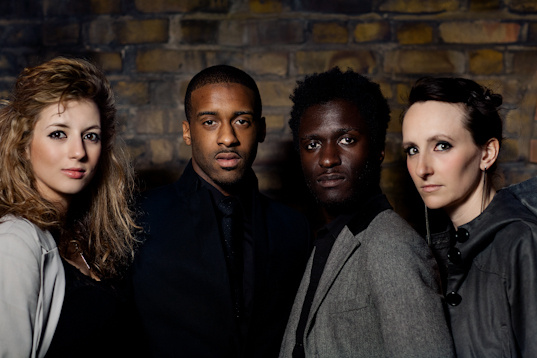
From left to right: Emma Smith, Shakka Philip, Kwabena Adjepong, Sarah Ellen Hughes
I know to expect great things from Sarah.
Praised highly by the likes of leading jazz vocalists Claire Martin and Ian Shaw, as well as having sung as the principal vocalist for NYJO, Sarah is known for her superb arrangements of jazz tunes, especially in the vocalese style. After a really successful year in 2010 during which she recorded her new album with Jim Hart, Dave O’Higgins and Ian Shaw, Sarah is now leading a vocal group, Sector7.
I was invited to photograph Sector7’s launch gig at 606 Club in Chelsea, London, which was a sell-out success.

Each of the singers has such enormously different voices in terms of timbre and style, not to mention strong, individual on-stage personalities, but they have such a fabulous chemistry between them and their voices gel really beautifully as a quartet. The audience was clearly bowled-over for the majority of both sets by the sheer joy and talent they were presented with.
As for the styles of music, they ranged from the inspired choice of a Bjork cover to Chick Corea’s Spain; it’s almost a discredit to the impressive fusion of styles to label it merely ‘soul’, ‘funk’, or ‘jazz’.
You can hear their music and learn more about Sector7 on Sarah’s website here: http://www.sarahellenhughes.co.uk/fr_home.cfm
I managed to snatch 5 minutes outside with the group before their soundcheck to grab a quick group shot. (See first shot above.)
And some shots with shoot-through umbrella positioned slightly to camera-left during sound check and rehearsals:


Award winning British composer Cheryl Frances-Hoad makes it onto the front cover of Issue 30 of the BASCA magazine.
Photograph by Mat Smith Photography using RadioPopper wireless triggers.

You must be logged in to post a comment.